• Home
  • About Us
  • Blog
  • Newsletters
  • Contact
  • Facebook
  • Instagram
Flair Cleaners
  • Locations
      • Redondo Beach
      • Redondo Beach (310) 318-8652
      • Santa Monica
      • Santa Monica (310) 395-9354
      • Studio City
      • Studio City (818) 761-3282
      • Valencia
      • Valencia (661) 753-9900
    • Close
  • Services
      • Dry Cleaning
      • Laundered Shirts
      • Household Linens & Bedding
      • Wash & Fold Laundry
      • VIP Express
      • Costume Department
      • Tailoring
      • Specialty Items
      • Fire & Water Restoration
    • Close
  • Delivery
  • Flair Cares
    • Environment
    • Community
    • Our Guarantee
    • Customer Satisfaction Survey
    • Close
  • Mobile App
  • Coupons
  • My Account
    • Log In
    • Sign Up
    • Close
  • About Us
  • Contact
  • Privacy Policy
  • Terms of Use

There’s More Than One Way To Tie A Tie

February 15, 2019 | Leave a Comment

tie

Most men use the same knot over and over on their neckties. But, some ties look better with different knots. For example, thicker ties look better with smaller knots like the Four-in-Hand. Thin ties, on the other hand, look best with larger knots like a Windsor. Here are some simple directions for three knots every man should know how to tie.

The Four-In-Hand Tie Knot

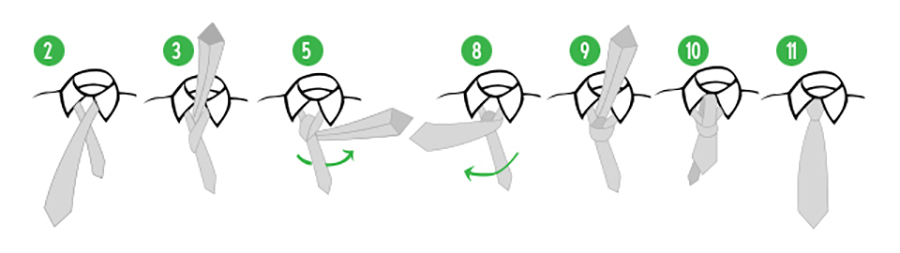
The Four-in-Hand is the most common necktie knot. It is simple and versatile, and offers a slim, tapered look. And, it is self-releasing making it simple to take off at the end of a long day.

  1. Start with the wide end of the tie on the right and the small end on the left. The small end should be slightly above your belly-button. Keep this in place while tying the knot.
  2. Put the wide end over the small end to the left and under the small end and to the right.
  3. Bring it across the front and to the left and up into the neck loop from underneath.
  4. Then, take it down through the loop you’ve just made in the front.
  5. Tighten the knot by pulling down on the wide end. Slide the knot up and adjust.
Four-in-hand tie knot diagram
The Windsor Tie Knot

The Windsor knot’s symmetrical and triangular knot works best with a spread collar.

  1. Start with the wide end of the tie on the right side and the small end on the left. The tip of the small end should rest slightly above your belly-button. Once in place, do not move the small end.
  2. Move the wide end over the small end to the left and up into the neck loop from underneath.
  3. Then pull it down to the left and around the back of the small end to the right.
  4. Next bring it up to the center, towards the neck loop. Pass through the neck loop, down to the right and across the front to the left.
  5. Bring it up into the neck loop from underneath and then down through the loop you’ve just created in the front.
  6. Tighten the knot by pulling down on the wide end. Slide the knot up and adjust.
The Windsor Knot Diagram
The Half-Windor Tie Knot

Another handy knot to use is the Half Windsor. It is actually about three-quarters the size of the Windsor knot, nearly symmetrical with a deep and substantial dimple.

  1. Start with the wide end of the tie on the right and the small end on the left. The tip of the small end should rest slightly above your belly-button. Keep it in place until the final step.
  2. Bring the wide end over the small end to the left and under the small end and to the right.
  3. Move it up to the center, towards the neck loop.
  4. Then bring it through the neck loop and to the left, across the front, and over to the right.
  5. Move it up into the neck loop from underneath and down through the loop you’ve just created in the front.
  6. Tighten the knot by pulling down on the wide end. Slide the knot up and adjust.

Nice ties can be expensive. That’s why they take extra care to keep them looking good. At Flair, our experts can provide advice and cleaning to ensure you get the most out of your investment.

Categories: Clothing Care

Leave a Comment Cancel reply

About Our Blog

Welcome to Living with Flair, the official blog of Flair Cleaners. New to our blog? In a nutshell, we are Southern California’s leading eco-friendly dry cleaning business and we’re passionate about clothing, our community, and our environment. Learn more about us

Our blog is intended to help us all live life with Flair, by providing tips, ideas, and useful information, as well as to share some of the exciting things going on in our stores and our community. See something you like? Be sure to share it with your friends.

Blog Archives

Categories

  • Clothing Care
  • Community
  • Environment
  • Flair Cares
  • Holidays
  • Lifestyle Tips
  • Style Tips
Read Our Newsletters

Flair Cleaners Mobile App

Download Our Free Mobile App

  • Easy to use
  • Saves time
  • Special offers
Learn More
Win $100 in Free Dry Cleaning! Complete Our Satisfaction Survey ›

Sign Up for Our Newsletter

Newsletter Sign Up Form

Monthly tips, news, savings, and more.

  • This field is for validation purposes and should be left unchanged.

  • We Proudly Use GreenEarth Cleaning
  • Drycleaning and Laundry Institute Certification
  • Drycleaning and Laundry Institute

Savings

  • Coupons

Locations

  • Redondo Beach
  • Santa Monica
  • Studio City
  • Valencia

Services

  • VIP Express
  • Dry Cleaning
  • Laundered Shirts
  • Tailoring
  • Household Linens & Bedding
  • Wash & Fold Laundry
  • Costume Department
  • Specialty Items
  • Fire & Water Restoration

Delivery

  • Delivery

Flair Cares

  • Environment
  • Community
  • Our Guarantee
  • Blog
  • Newsletters

About Flair

  • About Us
  • Testimonials
  • Employment Opportunities
  • Contact

My Account

  • Log In
  • Sign Up
  • Mobile App
  • Privacy Policy
  • Terms of Use
  • Facebook
  • Instagram
Flair Cleaners Logo

© 2025 Flair Cleaners. All Rights Reserved.

Request a Pickup

  • (Note: Pickup and Delivery may not be available in your area on certain days of the week.)
    MM slash DD slash YYYY
  • This field is for validation purposes and should be left unchanged.